Why would you ever want to install Android on your netbook?
Well, surprisingly Android works really well as a mobile operating system even on a laptop. It’s free unlike Windows or Mac and it’s sleeker and easier to use than Linux. The Android marketplace has become very large now, and most applications that you like on your Android mobile will work on your netbook too. Of course, with a netbook you lose the touch screen, but you gain a keyboard, touchpad, plenty of USB ports and a microSD card slot. It seems a fair trade, and if you’ve got a netbook on hand then it’s definitely worth a try.
I’ll be going over exactly how you install the operating system onto your netbook, and how it all looks when it’s up and running!
How to install Android 4.0
1. Download Android 4.0 to your main computer
The first thing you need to do is visit the Android x86 download page and choose the right ISO file to download. Ice Cream Sandwich is near the bottom of the list, with its section titled “Android-x86-4.0-RC1”. You’re given a few different options, so go with whatever sounds closest to your platform – I went with “Asus Eee PC family” and would recommend this for use with a netbook. The installation process isn’t difficult or long, so don’t be afraid to try a different ISO later if the first doesn’t work. Just download the file to whatever PC you’re using – it needn’t be the one that Android will be installed on.
2. Copy the ISO file to a USB drive
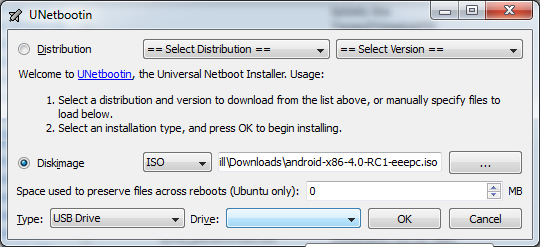
Once you’ve got the ISO downloaded, you’ll need to get it onto your netbook. As most don’t come with CD drives, the best way is to download a tool called UNetbootin. Once you’ve downloaded the tool, just run the file and you’ll see the screen below.

Click on the button with the three dots on the right side of the window and select the ISO file you’ve downloaded. Then, select the drive that you want to copy the ISO file across to. Expect to lose everything on the USB drive that you select, so tread carefully and make sure you copy off anything you want to save first!
Once you’re confident about your selection, hit OK. A window will pop up for a short time while the file is copied across, and then once the operation is complete you’ll be informed and asked if you want to restart your computer. Hit ‘No’, then eject the USB drive.
3. Prepare the netbook
Now that you’ve got the ISO file onto your USB, you’re almost ready to go. If there are any files that you would mind losing on your netbook (like pictures, documents or videos) then be sure to back them up now. Your data on these drives should be preserved, but there’s always a chance of something going wrong so it’s better to be safe than sorry.
Plug in the USB drive and power on the netbook. You’ll need to press a key (likely Delete or one of the F keys, e.g. F1) in order to choose which device to boot from – here you want to select the USB drive from the list. If you don’t have the option to get a boot menu, you’ll need to go into the BIOS and change the boot order, such that the USB drive will come before any other device.
4. Boot into the installer
There’s a good step by step guide here, but here’s the short version:
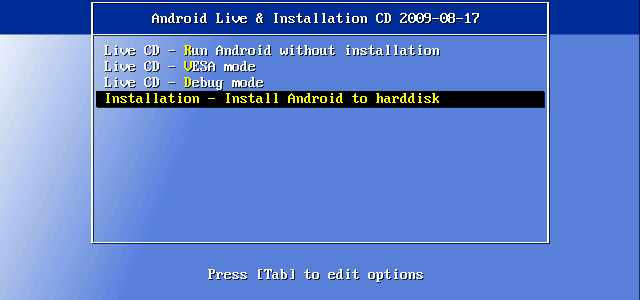
Once you’ve set your boot order and inserted the USB, you should be booting into the graphical installer for Android x86. This menu will give you the option of booting directly into Android 4.0 without installing it, so you can try it out without messing around with your drives. For the purposes of this tutorial though, we’ll assume you want to install it permanently so choose that option.

Here you’ll have to select a drive to install it to – you can choose any EXT3/EXT2 (Linux) or NTFS/FAT32 (Windows) partition. You shouldn’t need to format (e.g. delete and wipe) the drive you’re installing to, but it’s worth having your files backed up regardless.
Once you’ve selected a drive, you’ll be asked to choose a size for the install. Go ahead and choose the maximum size (which I believe is 2048 MB). This will take some time depending on the speed of your hard drive, so this may be a good time to make a cup of tea. You’re also able to make a virtual SD card at this time, and after this you’ll be asked to reboot. Do so, and remember to take out the USB drive when the machine powers off.
5. Android!
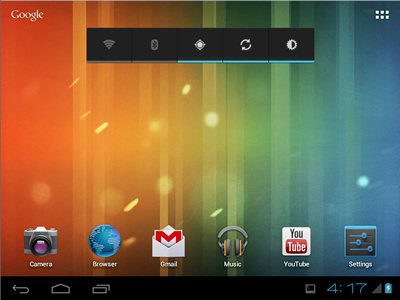
Now you should be able to boot into Android. Choose the first entry in the boot menu, and your netbook will start to run Android. There’ll be some exciting white text on a black background, followed by the glowing Android logo, and then finally the OS itself and its ‘Welcome’ screen. You’ll be asked to connect to a wireless network and sign into your Google account, as well as a few other basic questions about the current time and so forth. With these completed, you’ll finally be onto the Android desktop!

In our next article, we’ll have a look around our new Android x86 installation, and show off a few of the unique apps that come with it, so stay tuned for that.
As always, feel free to ask questions or leave comments in the section below. You can also contact us on Twitter or Facebook.
Edit: I’ve written up a FAQ (frequently asked questions) article. Read it here.
It’s also worth noting that we’re not responsible for any damages or disasters that occur through following these directions – things can always go wrong, so back up your files before installing Android 4.0.
unable to install as easily as this instructions suggest. plenty of non applicable hitches along the way. if it were all this easy, I doubt the person who made this little b.s. blog would have posted it. obviously he had hours and hours of difficulties, and this blog here leaves out a ton of pitfalls and errors along the way. OS will not load once inside first window to install Android, just for starters on errors here.
Hmm, I’m not sure. It might be possible to re-install and try some different partitioning settings. Otherwise, the SD card thing will probably work, although not all apps can be installed there.
I got it to work and it’s been running wonderfully for days! However, in the ICS Settings menu it’s telling me that I only have 504 MB of data on the whole computer, which seems weird to me. Did I do something wrong? Am I going to have to re-install ICS and do it differently, or is there a way I can increase ICS’s storage further into my hard drive without re-installing it? Worst case scenario, I would just have to pony up for a 64 GB SD card, and keep it perpetually plugged into the netbook.
Hmmm… no harm in letting it do its thing for a bit, but obviously if it lasts more than 20 minutes or so then it’s probably gone wrong. Maybe try a different .ISO file, maybe even the Jelly Bean builds that are available now?
About 30% through the actual installation to the hard drive, my screen just went black. No display. It’s still on, it’s just displaying black. Should I be worried, or just let it do its thing?
I’m guessing your Acer netbook is running an ARM chip, so this project (Android for x86) isn’t relevant for you ;)
I believe I used the EeePC version of Android 4.0.
sir i have same netbook which is shown in the image on upper screen,… so which anroid file i have to download?
how to go to step 4? plz help
Works fantastically on my EeePc1000. This older netbook now zips across the internet at a fast clip. Only complaint is that Spotify isn’t supported on this machine, but Rdio is. Battery usage is also a plus with this OS. Thanks!
help please … I followed your guide step by step … I used my laptop to create the USB … I restarted the same laptop, got the menu, chosen “run Android without installation” and works great … THEN … tried the USB at my netbook and NEVER saw the starting MENU (of course I entered boot-menu and chosen USB first) … can you help me please ??? … what am I doing wrong ???
(P.S. I have an old netbook Belinea Sbook1, with a touchscreen, with Windows7 running right but VERY SLOW … that’s why I’m trying to install Android which is lighter and faster … thanx)
how 2 install campaq mini
thanks for the guide. installed it successfully. is there any apps for this? are games the same as downloaded on the phone? waiting for your next article….
Thanks for the guide, tried ESC or F2 but couldn’t get into boot setup for Eee Box, turned out it’s DEL. Installed it easily, thanks.
Only nagging issue is no Flash support (from Adobe) for this x86 version of Android, not yet, so no youtube or streaming. Hope Adobe or some hacker will figure out how.
What do you mean? Once it’s installed, you shouldn’t need to use the pendrive again to boot into Android. Then you can just format the pendrive in Windows if you want to use the pendrive for other things :)
how to use pendrive after installing this …..
my acer netbook is already pre-loaded with android 2.3 i want ti install ICS now how can update 2.3 to 4 … is there any possibility , or i have to fresh install ICS.
Does anybody know which iso I should use for the Vye Mini-V S37
Easy to use and works great on my Dell Inspiron mini v10 – Except no wifi
Is there some way to use the Terminal Emulator in Android to activate it?
I can use it my grundig nb 1010 but i need help for something. I need to use my Huawei 3g modem on it :D is there a way to use it? :D
I’m afraid if the drivers aren’t set up properly by default, then I know of no way to install them later. Try a different version of x86.
I’m afraid if the drivers aren’t set up properly by default, then I know of no way to install them later. Try a different version of x86.
I was able to install this on my acer aspire one, and it runs perfect, however it’s not detecting the built in wifi. Is there a way to setup drivers?
I was able to install this on my acer aspire one, and it runs perfect, however it’s not detecting the built in wifi. Is there a way to setup drivers?
To turn off your netbook, double tap the power button and then press ‘Yes’ on the prompt that appears.
For uninstallation, see http://keyable.blogspot.co.uk/2012/01/remove-android-x86-and-grub-loader.html
Yup, that’s the main downside at the moment – not all apps are working. Expect this to get better as Android x86 is developed and Intel x86 phones get more common, but I don’t know of anything that can be done at the moment to improve the situation.
I got it installed or at least running on my eeepc, loving it, however the apps are limited due to it not working on my device. any thoughts, even skype wouldn’t work.
Anyone tried this on the AA1 or A510?
As far as I know external displays aren’t yet supported.
If you installed it to the hard drive, you will be asked to boot into one or the other when you start your netbook.
Is it possible to use VGA Out on Acer Aspire One?
So I got it done and it worked nice and all, my only problem or question actually is that say I turned off my computer and went back to my Windows 7, how would I get back to the Android? and also how could I get rid of it if I don’t want it anymore?
That means the copying process from ISO to USB has failed. Try with a different USB drive.
Personally, I can’t get past the “Missing Operating System” prompt when trying to boot from the USB drive…
Yup, mice and keyboards and track pads all work :)
possibly a silly question. But does a mouse work? Are there built in drivers for it?
Awesome, let us know how you get on!
Hi Erondon – it’s the Nyan Cat Extreme; here it is:
https://play.google.com/store/apps/details?id=com.wtf.awesome
can you please share the wallpaper on your nexus? :)
Definitely the easiest guide I’ve seen on how to install Android to a netbook. As it happens, I do have a netbook lying around so once my partner gets home I think we’ll install Android on the netbook (because she’s nosy and would like to see it being done too :p).