
Today we’ll be using the Nexus Root Toolkit (NRT) to root, unlock the bootloader and install a custom recovery on a Nexus 7 (2013) tablet.
Root access lets you remove pre-installed apps, make full backups, and install root-only apps which block ads, mount USB storage and take control of your device in other interesting ways. You can also install custom ROMs, which are community-designed remixes of Android that can include overclocking, additional customisation options, new UIs and other special features.
It’s quite fun to try out new apps and ROMs, and you’ll definitely learn a lot about Android doing it! Let’s get started, beginning with the obligatory warning…
THERE IS A SMALL RISK OF LOSS OF DATA AND FUNCTIONALITY TO YOUR DEVICE. While I have followed the steps above successfully, many times, it’s worth proceeding with caution – we at Mobile Fun can’t be held accountable for anything that happens through following these instructions. Good luck!
1. Install and launch the Nexus Root Toolkit

To begin, we’ll download the latest version of the Nexus Root Toolkit from Wugfresh.com. Install and launch the application. Once launched, you’ll be asked to select your model and Android build – be sure to check what this is in Settings -> About this tablet before proceeding. The firmware listed at the bottom (KRT…) is the info you want.
2. Install drivers
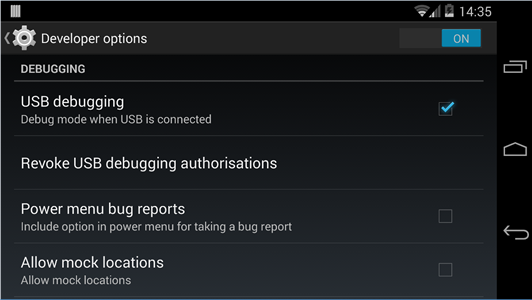
Next up is installing drivers. This can either be quick and easy, or the longest part of the process. To begin, you’ll need to enable USB debugging – go to Settings -> About tablet, then tap on the build number at the bottom of the screen seven times. Then, go into the newly created Developer Options menu in Settings and turn on USB debugging. Finally, connect your tablet to your PC using your best (ideally original) micro USB cable.
Just press the ‘Full Driver Installation – Automatic + Manual’ button, then follow the instructions. Generally this involves removing all other drivers, installing new ones provided by the program, then running a test to see if everything has worked.
At some point a window should appear on your tablet asking if you trust the computer you’re connecting to for USB debugging – be sure to say OK, and tick the ‘remember’ box too. If this window doesn’t appear, then you may need to toggle between a PPT and Media connection (press on the USB connected notification and then select the relevant checkbox to do this). Once properly done, you should be able to pass the Driver Test in the final tab of the NRT – and then you can move onto the fun part(s) of this tutorial.

3. Backup
Unlocking the bootloader on your Nexus 7 will wipe the tablet, so be sure to backup everything first. You’ll want to copy off all pictures and other important data using Windows Explorer (just open the tablet while it’s mounted on your PC, then check the DCIM and Pictures folders for pictures). Backing up apps and other settings is accomplished via the NRT itself; press the Backup button and then select Create Android Backup File. Again, follow instructions – you’ll need to OK the start of the backup process, then wait around until everything is copied to your PC. My backup took about 10 minutes to complete, so feel free to go for a coffee break.

4. Unlock bootloader
Our next step is unlocking the bootloader. As mentioned before, this will result in a FACTORY RESET OF YOUR DEVICE, WHICH ERASES ALL USER DATA – so make sure you’re happy to lose everything on the tablet! It also voids your warranty, so be forewarned.
Allow the NRT to reboot your device into bootloader mode automatically, then you’ll be asked to confirm on the tablet that you do indeed want to unlock the bootloader. The bootloader will be unlocked quickly, and a factory reset will take place. Wait until the tablet has booted back up, then go through the initial setup process again – you’ll need to connect to a wireless network, sign into a Google account, etc. Once you’re through it, just re-enable Developer Options and USB debugging in the same way you did before.
5. Root and install custom recovery
In the root section of the NRT’s main window, check the checkbox next to ‘and also flash Custom Recovery’, then hit the Root button. Follow the instructions provided; you’ll typically reboot into the Bootloader, install TWRP recovery software, then copy over the SuperSU binaries.
Once the operation has completed successfully, your tablet will boot back up. Be sure to go into the Busybox installer – grant it root permissions, then let it prepare its smart install. Press the Install button when the progress on the screen has ceased. You may also want to open the SuperSU app, to ensure it doesn’t need updating.

6. Restore backup
The final step is restoring the backup made in step 3. Just open the Restore section of NRT, then select the .ab file you made earlier. As before, accept the restoration and then wait for the file to be transferred and applied. Once completed, feel free to copy across any photos or other media that you backed up as well.

7. Celebrate
OK, you’re done! I hope everything went to plan. I did this myself earlier today, and happily it only took about 20 minutes – the vast majority of this was waiting for the backup files to be copied! If you do run into problems, the best place to take them is the XDA thread for the Nexus Root Toolkit.
Now that you’ve got an unlocked bootloader, root and custom recovery installed the world is your burrito! Try some new custom ROMs or install root-only apps that allow connecting to all kind of Nexus 7 (2013) accessories like wireless game controllers or USB drives. There’s a lot to explore, so have fun.
Thanks for checking the article out and I hope it was helpful. I welcome your feedback in the comments below! li