Nokia have always produced fantastic fitted car kits but their plug & play car kits have been good, but not really anything to shout about. The Nokia HF-310 and Nokia HF-510 have just been announced as replacements for the HF-200 and HF-300, but are they any better? What have they got that makes them different to the ones they’re replacing? I wasn’t too sure either, as at first glance a bluetooth car kit is just a bluetooth car kit, right?
I grabbed a Nokia HF-310 and tried it out to see how the new Nokia car kit shapes up.
In the Box
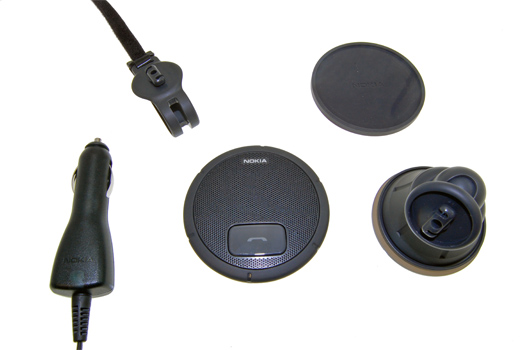
With most ‘plug and play’ Bluetooth car kits, you normally get the loud speaker, visor clip and a charger of some description, you get the same with the Nokia HF-310, but you also get a couple of extra items – a windscreen suction holder and a suction pad that you can use anywhere in the car. The charger that the HF-310 uses is a Nokia DC-4, the same 2mm car charger that most of the current Nokia handsets use, so you won’t need to buy a seperate charger for your phone.
Mounting Options
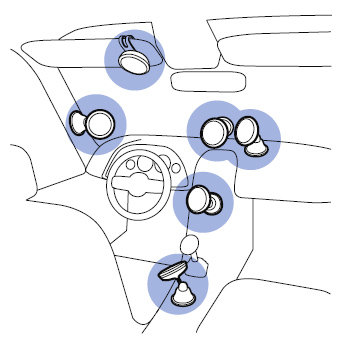
Nearly every simple car kit I’ve tried either clips on your sun visor or plugs into your cigarette lighter, now this may seem like convenient places for them to go, but in reality it often means that the built in micorphone is nowhere near you or your mouth which can lead to the person on the other end of the phone really struggling to hear what you’re saying. The Nokia HF-310 has a number of tricks up its sleeve to overcome this problem. The HF-310 is a small kit so you’ll find you can mount it just about anywhere. The HF-310 measures 80mm x 21mm so it’s roughly the same size as your tax disc.
Visor Mount
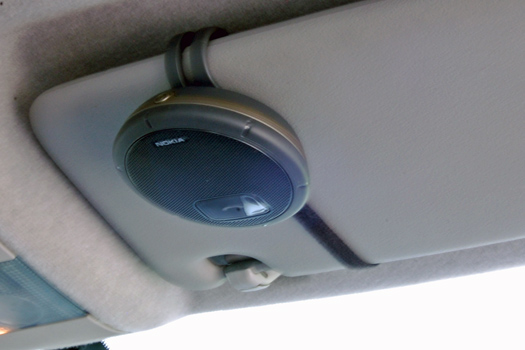
Unlike most kits, the visor clip on the Hf-310 isn’t just a clip. It clips on to your visor and a velcro strap wraps round the visor and secures the clip in place so there is no chance of it falling off when you pull your visor down. A tip for you when you’re fitting it is to fold your visor down and swing it out if you can – the velcro got stuck to the roof lining on my car and proved a little tricky to pull off again! Now, you’re not going to want to keep undoing this strap each time you want to use the kit, so Nokia have given the HF-310 a twist-lock bracket that makes it quick and easy to remove the kit without having to remove the strap. Just grab the speaker, rotate it 90 degrees and it comes off. Simple.
The only downside that I found with using the visor mount is that if you pull the visor down, the speaker is then facing the windscreen and there’s not a quick way to turn it round to face you, so you may struggle to hear/be heard while the visor is down.
Suction Mount
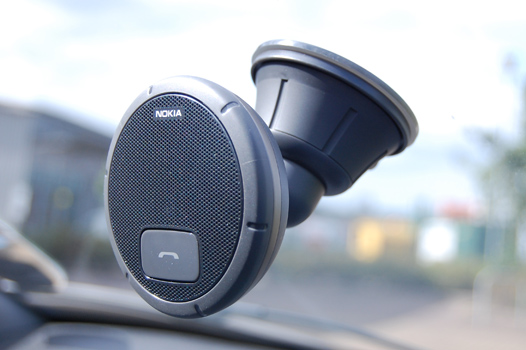
Nokia must have realised that using a handsfree on a sun visor can have it’s problems as they’ve also included a suction mount for the HF-310. I can’t think of any other car kits that have this as a mounting option, but its actually a great way to use your HF-310. The suction mount isn’t like some of the budget ones that you may have seen where you have a long bendy arm coming towards you, it’s a compact design that fixes by pressing it against the glass and twisting the base. To remove it twist it back and it pops straight off. It has the same twist-lock fixing as the visor mount so it’s easy enough to switch between holders.
If you don’t want to position the HF-310 on your windscreen or on the visor then you have a third oprion. The kit includes a self adhesive suction pad that you can stick to any flat surface in your car. This pad provides the perfect base to attach the suction mount on to and means that you can position the speaker unit pretty much anywhere you want in the car.
Getting Started
Before I could use the kit, I needed to pair it with my phone and this was a quick and simple task. The HF-310 went into pairing mode as soon as I turned it on and my phone found it straight away. Once I’d entered the passkey (0000) the phone was connected and ready to use. The whole process took less than 30 seconds and was probably one of the easiest Bluetooth pairings I’ve ever had to do.
Simple Controls
Handsfree car kits need to be really simple to use and that’s exactly what this is. There is just one button on the front of the speaker that answers/ends calls, can redial the last dialled number and activates voice dialling (if your phone supports it). I had this paired up with my Nokia N82 and it worked perfectly. At higher speeds road noise did affect voice dialling, but moving the HF-310 closer to me improved it.
The only other control on the HF-310 is the volume control, and at first glance you might not see it. The volume control is actually the outer dial and it works in the same way as it does on the Nokia CK-7W fitted car kit. Turn the dial clockwise to increase the volume anti-clockwise to decrease it.
Call Quality
The HF-310 has technology built into it that reduces background noise and echoes so using the kit while you’re driving should be a pleasant experience for both parties on a call, and to be honest it was. For town driving I didn’t experience any problems at all. I could hear the caller perfectly well, and the caller could hear me. Neither of us had to ask the other to repeat ourselves. Motorway driving was slightly different, there was the occasional missed word during a call, but this was in frequent and barely noticeable. At 70mph on the motorway, road and wind noise meant I had to increase the volume, but I was still able to hear the other person pretty clearly. Passing lorries and trucks did make it a little more difficult to hear but it was still possible.
Battery Life
Battery life in car kits is really important. The last thing you need is for the kit to run out of power while you’re on a call. The battery in the HF-310 will give you upto a massive 30 hours talktime and 960 hours (40 days!) stand by time from a full charge. The kit will power off automatically after around 10 minutes if there is no phone connected to it.
Nokia HF-310 Vs Nokia HF-510
At the time of writing this, the HF-510 hasn’t arrived in to stock, but it’s essentially the same kit with the addittion of Caller ID. It has a small LCD screen above the answer key that will show you the name of the person that is calling you. In order for this to work properly, you’ll need to send the contacts of your address book to the car kit using bluetooth, but this is a simple process that takes only a couple of minutes. If a number calls you that isn’t in the phonebook on the car kit, it will just display the number. The only other difference is that the screen uses more power so the standby time drops to 180 hours (7 days). To be honest, if you’ve got a car holder for your phone, you’ll see who’s calling on that, so I’d say that the HF-310 is a better option because of the massive increase in stand by time.
Summary
Overall, I’m impressed with the HF-310. Audio quality is great and it’s extremely simple to set up and use and I think by far its best feature is the flexibility you have when it comes to mounting the HF-310 in the car. For the price, there are couple of extra features that would have been nice – Multipoint, Text to Speech, A2DP or FM transmitter, but that would then make it a much more advanced and complicated car kit and that’s not what the HF-310 is all about. The HF-310 is simple, effective and the build quality means you’ll be using this for years, not throwing it away after 6 months.
Rating: 8/10
For more images of the Nokia HF-310 in use head over to Page 2.


One thought on “Nokia Speakerphone HF-310 Review”
Comments are closed.