Almost everyone I know has a charging cable for their phone or tablet that’s in a pretty poor state. Maybe there’s a nick in it where they ran it over in their office chair; maybe there are just awkward knots and bulges from months of everyday use. Either way, you really shouldn’t be using a cable like that — there’s no telling when that damage will progress far enough to give you a shock, zap your phone or even start a fire — which happens with regularity in the UK and across the world.
Here’s our ultimate guide to cable safety, in three parts: when to replace a cable, how to fix damaged cables, and how to prevent cables from getting damaged in the first place.
Part 1: When to replace your damaged cable
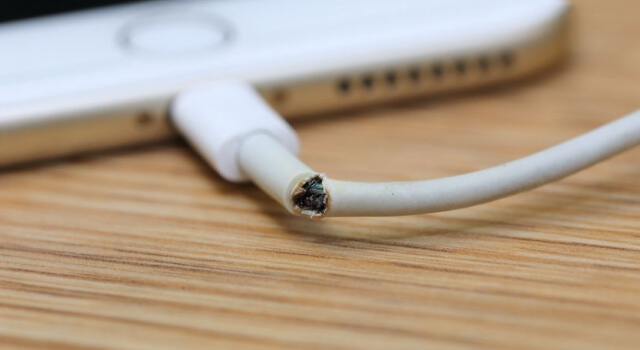
First of all, a public safety announcement: if the outer layer of your power cable is frayed or nicked, or if it’s bulging out, there’s a decent chance that the more critical inner layers are damaged too.
You might be lucky and get away with just fixing the outer layer, but there’s also a non-zero chance that your cable will be sufficiently damaged to short circuit your device or start an electrical fire, and you don’t want that.
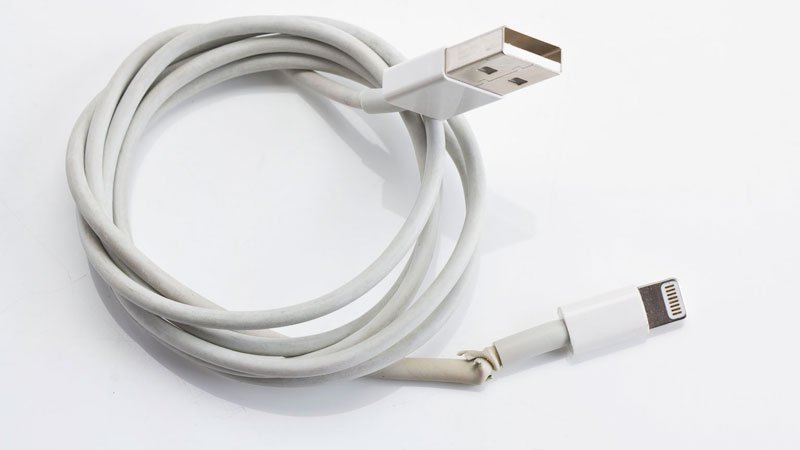
Above: This cable is too far gone. Throw it out.
Cables are cheap; if your power cable looks badly damaged then it’s best to just throw it away and buy a new one. £10 isn’t nothing, but it’s way cheaper than buying a new phone or replacing the contents of your burnt-down house. Plus, this is the perfect opportunity to pick up a cable that’s better suited to you, whether that means it’s longer, shorter, made from a different material or in a different colour.
(Shameless plug: Micro USB, USB-C and Lightning cables are all available at Mobile Fun.)
For power cables that are still in near-perfect condition or cables that don’t carry (much) power, you’re probably fine to fix your fraying cable and continue using them. Use your best judgement and be careful.
Part 2: How to repair damaged cables
There are plenty of ways to repair damaged cables; here are a few of our favourite methods.
1. Use a cable protector
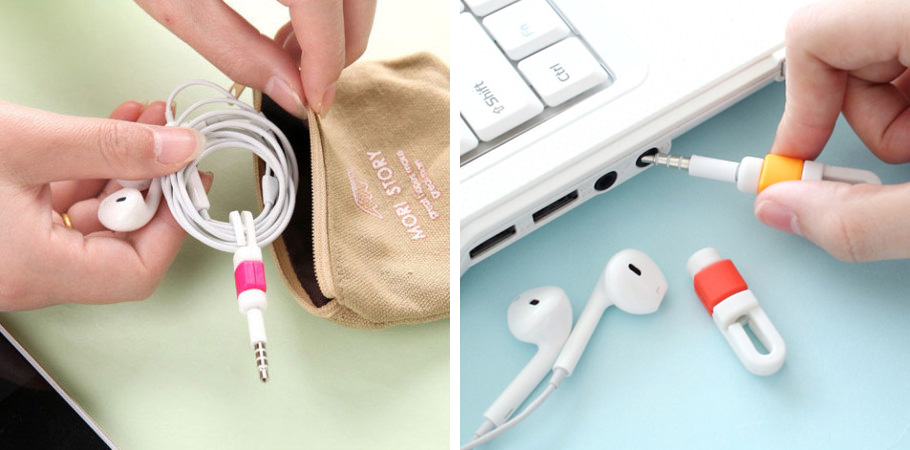
The easiest way to keep your cables on the straight and narrow — and out of harm’s way — is to use a cable protector like this one, the Link+ Universal Cable Manager and Protector. This innovative protector simply clamps around the vulnerable tail part of the connector, protecting it from being bent or pulled apart. This has a massive impact on the live of your cables, allowing them to survive daily use for months or even years. This particular cable protector also includes a cable tidy, making it easy to wind up your cables when they’re not in use. This works great for headphones, charging cables and more.
2. Use Sugru or electrical tape
The most obvious way is to simply wrap the affected area tightly with electrical tape. This is good for fixing small nicks in the cable that haven’t yet resulted in more serious interior damage, but it can reduce the flexibility of the cable.

That lack of flexibility can make Sugru a better choice. This mouldable glue feels like putty out of the box, but wrap it around a cable and leave it for 24 hours and it’ll turn into rubber. That protects the cable underneath without sacrificing flexibility, and the thicker coating should provide longer-lasting protection than electrical tape too.
3. Add a spring to give yourself more flex
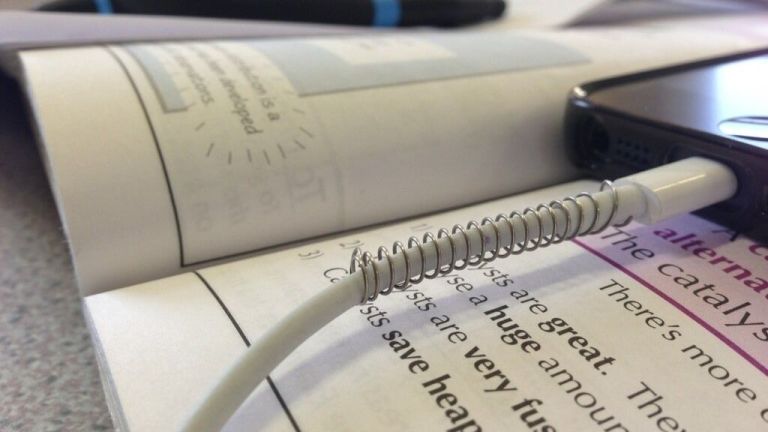
There are some inventive ways to reinforce your cables floating around on the web too. For example, you could get the spring inside a ballpoint pen and wrap it around the outside of a thin cable, giving it a bit of extra strength.
Remember to push it right to the connector; if you have it just around the thin part of the cable then you’re just concentrating your force into that area.
4. Use heat-shrink tubing
You can also pick up heat shrink tubing that goes over your cable, then contracts when exposed to heat (e.g. from a hair dryer). Remember to apply the heat from multiple angles, so that it contracts evenly.

Image credit: Smial @ Wikipedia.de
You can even combine this method with the previous one to get a budget armoured cable. You don’t need to wait until your cables break to use these methods either — a little preventative medicine goes a long way.
5. Get better cables
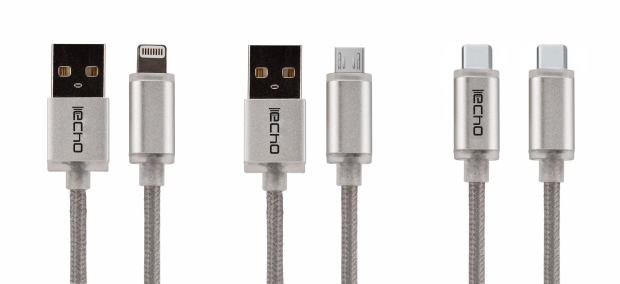
Of course, you could also just replace your cables with better ones, which are designed to last for years instead of months. There are plenty available that include kevlar, fabric braids and other armoured designs, and these can stand up to regular use and abuse better than their peers. We happen to stock a good selection, if you’re interested.
Shop Lightning cables > Shop Micro USB cables > Shop USB-C cables >
Part 3: How to prevent damaging your cables
When it comes to cables, some people are able to use their cables for years without damage, while others seem to go through a cable every few months without fail. It all comes down to habits — bad ones will curse your cables to a short working life. Thankfully, once you know, it’s easy to adopt good cable habits. Here are our best practices:
1. Unplug cables by holding the connector
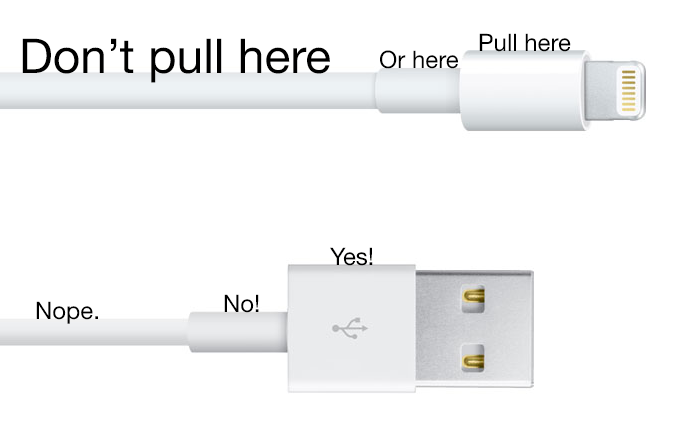
This is the most important one: do not pull your cables out by just yanking on the nearest bit of the cable you can reach. Instead, you should pull on the plug itself. This is the only part of the cable that stand up to repeated tension force you’re exerting.
Each part of the cable has a purpose, right? The majority of the cable, the thin part, is just there to prevent you from touching a live wire. The slightly thicker part near the end is also reinforced to prevent damage from bending. It’s only the end part, the plug itself, which is designed to resist the force of you pulling on it.
Unplug by gripping the plug, not the rest of the cable, and pulling out. This simple step can really extend the life of your cables, so give it a try.
2. Store your cables neatly
There are definitely better and worse ways of storing your cables. Just throwing them into your bag in a tangle of wires is probably not ideal; it makes it likely that you’ll need to yank them apart when you need to use them. So we need a good way of rolling your cable, so that it stays in one place, but doesn’t damage the cable by introducing stress to the ends, crimp it or introduce any unsightly bends.
If you ask anyone who works with cables for a living — an electrician, a sound technician, an IT nerd — then one of the best options is called ‘Over / Under’. Musician Kennis Russell gives a good explanation in a YouTube video (method starts at 3:08). If you’d prefer a quicker explanation, this one is good too.
By following these instructions, you’ll be left with a cable that should last a lot longer to one that’s coiled up by a more naive method or left in a mess at the bottom of your bag.
You can also combine the over/under method with velcro cable ties, to get cables that last a long time without fraying, and are super easy to unwind and use straight away.
Wrapping up
To wrap up:
- Throw out badly damaged cables — it’s not worth the risk.
- Fix cables with minor damage, or preemptively add protection.
- Pull out your cables correctly, and store them properly.
Alright, that’s about it! Thanks for reading our ultimate guide to fixing, maintaining and replacing cables. Be sure to let us know what you thought in the comments below.